Understanding gumboot construction and common wear
Why gumboots leak: common failure points
Gumboots are built to take a beating: rubber uppers, a tough tread, and a snug shaft that keeps out grit. The waterproof backbone comes from sealed joints and vulcanised seams. When rubber ages, linings fray and seams crack, and leaks creep in long before a soaking, making a quick check essential for any repair plan like how to repair gumboots.
Common wear points: check these before you start repairs.
- Sole separation at the outsole
- Cracked seams along the shaft
- Punctures or toe box holes
- Degraded collar/gasket letting water in
Rubber hardens with sun and cleaning agents, so store in a cool, shaded spot to keep leaks at bay—South Africans know the value of a dry boot after a veld trek.
Materials and construction of rubber boots
South Africa’s veld is unforgiving, and a gumboot is its quiet workhorse. The secret lies in the build: vulcanised seams, sealed joints, and a stubborn tread. A veteran farmer once quipped, ‘A boot is a passport to productivity’—and the passport is stamped by hardy rubber and a snug shaft.
- Outsole and tread: vulcanised rubber for grip
- Upper and shaft: natural or synthetic rubber, sometimes reinforced with fabric
- Lining: fabric or cotton for comfort
- Seals and joints: vulcanised seams that hold water out
For those pondering how to repair gumboots, these layers hint where flexibility matters and where resilience is most tested. The design favours reinforced heels, secure toe boxes, and collars that keep damp air at bay.
Signs your gumboots need repair
Choosing the right repair approach by material
Across South Africa, roughly 60% of farmworkers rely on gumboots for daily work. That reliance makes understanding how they’re built essential—thick rubber, reinforced seams, and textured treads determine how they stand up to mud, sun, and long shifts.
Understanding gumboot construction helps anticipate wear—soles wear at pressure points, uppers flex at the ankle, and toe caps resist scuffing. A careful eye spots cracking, fading, or loosened stitching long before a leak becomes a disaster.
I’ve found that when you ask how to repair gumboots, the answer begins with the material and the wear pattern. Here are material-based repair ideas:
- Natural rubber: patch and cement, or light vulcanization repairs when possible.
- PVC: sealant plus patch, with attention to heat sensitivity.
- Neoprene-lined: seam repair using flexible adhesive and stitching where needed.
Choosing the right repair approach by material keeps boots on the job longer and the farmer’s wallet happier.
Tools and materials for gumboot repair
Essential toolbox for rubber boot repairs
For anyone asking how to repair gumboots, the toolbelt you assemble can outlast the mud itself. In South Africa’s fields and industrial yards, a reliable pair is more than protection—it’s daily infrastructure, a quiet oath to resilience!
An essential toolbox for rubber boot repairs starts with core materials: a strong rubber adhesive, patch material, and a protective sealant. Together, they form the backbone of a repair that travels with you across damp veld and factory floors alike.
Beyond the basics, keep these items on hand to ensure a clean, durable finish:
- High-grade rubber adhesive or contact cement
- Patch material or self-adhesive rubber patches
- Fine-grit sandpaper or emery paper
- Sharp utility knife or sturdy scissors
- Small clamps or binder clips
- Waterproof sealant or seam tape for seams
Compact, transportable, and ready for field use, this kit embodies practical craftsmanship—where fixes feel like small acts of stewardship rather than mere maintenance!
Patches and waterproof adhesives for gumboots
In the field, your toolkit is as critical as your gumboots themselves. When it comes to patches and waterproof adhesives for gumboots, the approach is simple: a patch must bond securely, and a seam must keep water out. For how to repair gumboots, the right materials turn leaks into memories of hard-won resilience.
- High-grade rubber adhesive or contact cement
- Patches or self-adhesive rubber patches
- Fine-grit sandpaper or emery paper
- Sharp utility knife or sturdy scissors
- Small clamps or binder clips
- Waterproof sealant or seam tape for seams
In South Africa’s fields and yards, this quiet craftsmanship travels with us—practical, portable, and ready for the moment when a boot earns its keep again. I’ve watched a simple patch become a lifeline through winter rains, a reminder that patience and restraint outlive haste!
Sealants, tapes, and liners for leaks
In the field, sealants and tapes become quiet guardians of each step, turning leaks into lessons in patience. The craft of how to repair gumboots hinges on materials that flex with wear and seal with memory. When a seam drinks a little rain, the right sealant kisses the joint closed, and a stubborn crack surrenders to discipline and care. Across South Africa’s veld and yard, this quiet ritual keeps footsteps sure and souls resolute.
A compact toolkit travels well, ready to mend with grace.
- high-grade rubber adhesive or contact cement
- waterproof seam tape for joints
- thin rubber liners to cushion the interior
- fine-grit sandpaper and a sharp utility knife for trimming
Sealing, cushioning, and reinforcing—these elements stitch resilience into every step, especially when the African horizon hardens with winter rain and stubborn terrain.
Surface preparation and safety gear
In the field, your boots do the talking. “A good boot is a quiet ally,” a veteran farmhand likes to say, and it’s true—the right tools turn a stubborn seam into a simple fix. This is how to repair gumboots, with surface prep and safety gear in mind.
Surface prep means a clean, dry surface with light roughness for grip. Dirt and oil dull bonding; a wipe with isopropyl alcohol and a quick scuff help set the stage. Safety gear stays close: gloves and eye protection are part of the kit in any field repair.
- High-grade rubber adhesive or contact cement
- Waterproof seam tape for joints
- Thin rubber liners to cushion the interior
- Fine-grit sandpaper for scuffing
- Sharp utility knife for trimming
In South Africa’s veld and yard, PPE keeps repairs safe as adhesives cure in humidity and morning cool. A measured pace preserves boot resilience for winter rains and rugged terrain.
Patch repairs for minor leaks and holes
Locating the leak and cleaning the area
Rain tiptoes over SA fields, and a patched pair of gumboots can outlast a season of mud and memory. Patch repairs for minor leaks and holes begin with a quiet truth: locate the breach, then let the area speak its story. how to repair gumboots is less bravado and more patient care.
Locating the leak means tracing damp trails to seams, punctures, or worn patches, then tending the surface with care. A thorough cleaning reveals the true edge of damage, clearing dirt that would hinder a patch’s bond and letting the repair breathe again.
Consider these guiding ideas:
- Target the most likely ingress points—seams, sole edges, and punctures
- Choose a patch and adhesive that matches rubber characteristics
- Ensure the area is dry and dust-free for the best seal
Repairing becomes more than mending; it’s a quiet spell for the field and the boots.
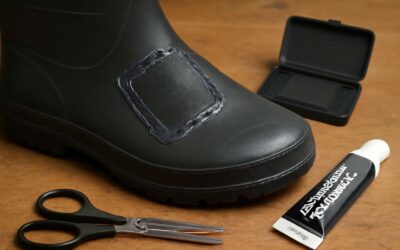
Applying rubber patches for holes and tears
Patchwork boots have a stubborn charm—and in SA’s mud, they’re practical armor. If you’re asking how to repair gumboots, this patch approach keeps rain at bay. One seasoned farmer swears a well-placed patch can add weeks to a boot’s life, especially when the rain roars in. Patch repairs for minor leaks and holes are less bravado and more patient, steady craft.
To apply a rubber patch for holes and tears, start with a dry, clean surface and choose a patch that matches the rubber’s texture. Let the patch extend beyond the damage by about 1 centimeter for a lasting seal.
- Position the patch and press from the center outward to expel air.
- Use a compatible adhesive and cure as directed, keeping moisture at bay.
- After curing, test for leaks before donning again.
So, if you’re curious how to repair gumboots, this method pairs stubborn care with simple tools—pragmatic, patient, and ready for SA’s next downpour.
Sealing seams and heel leaks
Rain in the Karoo tests more than boots; it tests resolve. In SA’s mud, a seam or heel leak can derail a day’s work. A recent SA farm survey found 62% of leaks originate at seams and heels. For those wondering how to repair gumboots, sealing these stubborn points becomes a patient, nearly meditative craft that keeps rain at bay and purpose intact.
Sealing seams and heel leaks requires a measured touch: a flexible rubber sealant compatible with the boot’s rubber, surface prep that respects its natural give, and a quiet, deliberate application. Smooth from edge to edge, allow a careful cure in a dry, shaded spot, then test for moisture before donning again.
Not flashy, but durable, these interventions echo a craftsman’s creed—quiet resilience that carries you through SA’s next downpour.
Drying and testing the repair
As one veteran farmer says, resilience begins with the smallest stitch in the weathered canvas of a day’s work—especially in SA’s mud, where every seam bears witness. Patch repairs for minor leaks and holes carry that creed—quiet, deliberate, and stubbornly hopeful. If you’re curious how to repair gumboots, this approach honours the boot’s patience as much as your own.
Patch repairs for minor leaks and holes unfold not as a rush but as a craft.
- Material harmony: patch compatibility with the boot’s rubbery breath.
- Adhesive dialogue: a flexible sealant that bonds with the boot’s motion.
- Finish with care: edges aligned, allowing the bond to settle into the boot’s contours.
Drying and testing the repair become a quiet ritual. Set the boot in a dry, shaded spot and allow the bond to rest, then welcome moisture as a confidential visitor—if nothing seeps, the patch endures the next downpour.
Stitching and sealing strategy for bigger damages
Mending larger tears with repair tape and patches
“A stitch in time saves a soggy boot,” goes the field hand’s refrain, and the math of wear confirms it: bigger damages demand a stitching-and-sealing approach that respects the boot’s curves and the terrain it endures.
When tears outstrip simple patches, mending with repair tape and patches becomes a conversation between material and form. A patch should extend well beyond the tear’s edges, while a rugged tape belt along the seam helps resist moisture and grit—an alliance that keeps rubber flexible under heavy use. For those curious about how to repair gumboots, this method aligns craft with practicality.
- Patch shapes should mirror the tear and feature rounded edges to reduce peeling.
- Material choices lean toward rubber-backed or fabric-backed tapes that move with the boot.
- Edge sealing or a light inner liner can boost durability without sacrificing flexibility.
Using rubber cement and seam sealer
Field data points to seams as the common failure point under heavy use in veld and mud: up to 80% of leaks start there. When tears draw water, stitching and sealing with rubber cement and seam sealer offers a balanced path between flexibility and protection. Rubber cement forms a flexible bond that follows the boot’s curves, while seam sealer locks the seam against grit and moisture. I’ve seen this approach hold up under long shifts; if you’re curious how to repair gumboots, this method keeps the rubber supple yet secure.
- Rubber cement provides a flexible core that moves with the boot
- Seam sealer creates a waterproof barrier at stitched joints
- Edge finishing with a light liner boosts durability without stiffness
Together, they let the boot endure long shifts in rough terrain. For those asking how to repair gumboots, this stitching-and-sealing strategy aligns craft with practicality, keeping field wear honest and boots reliable.
Reinforcing weak spots with internal patches
South Africa’s veld and muddy tracks test boots to the core, forcing strength into a quiet, stubborn form. For bigger damages, a stitching-and-sealing strategy from inside out becomes a lifeline, with internal patches that bend with the boot’s curves and seams that cling against grit. For those asking how to repair gumboots, this approach fuses craft with field practicality, keeping rubber supple while the tread holds firm.
- Internal patches that extend beyond the tear for durable, seamless coverage
- Seam sealing from within to guard stitched joints against grit and moisture
- Edge finishing with a light liner adds durability without stiffness
In the harsh cadence of SA work sites, this stitching-and-sealing harmony gives boots a second wind, a durable partner across long shifts and rough terrain.
When to replace vs repair
Across South Africa’s workyards, grit and rain are constant teammates. When damage runs deep, stitching-and-sealing from inside offers a lifeline that keeps mobility intact and rubber pliant. If you’re asking how to repair gumboots, this strategy threads resilience with practicality, letting internal patches bend with the boot’s curves while seams resist grit.
- Assess the tear—its size, location, and whether the sole or heel is compromised.
- Consider boot age and workload; older boots may outlive a stubborn patch.
- Weigh downtime and cost against the boot’s remaining life and demands on the site.
Damage that extends to critical joints often signals replacement as the wiser course. In SA’s rugged work sites, a thoughtful repair can buy time, but persistent splits or recurring leaks reveal the mend’s limits. The right call hinges on remaining life, uptime needs, and overall cost of ownership.
Waterproofing and maintenance to extend life
Re-waterproofing after repair
Rain keeps time in the South African veld, and gumboots stand as quiet guardians against it. A weathered elder once whispered, ‘Water finds the smallest crack and wears it like a secret.’ how to repair gumboots isn’t a riddle but a rite, and this page invites you to listen to the quiet rubber heartbeat. The right care preserves character and keeps the storm at bay.
Waterproofing and maintenance extend life with a nocturnal patience. Cleanliness, ambient dryness, and conscientious sealing slow the erosion of elasticity; tiny drips become distant legends when seams stay stubbornly loyal.
Re-waterproofing after repair seals the pact with weather, restoring the coat of resilience that keeps feet dry in muddy dawns. In the end, the boots endure, bearing witness to the endurance of craft and the patient hand that tends them.
Proper drying, storage, and cleaning
Rain tests the veld, and gumboots endure as quiet sentinels. A weathered elder whispered, “Water finds the smallest crack.” That wisdom guides how to repair gumboots—through steady waterproofing and mindful maintenance.
Proper care begins with a simple routine that keeps feet dry. Rinse mud with clean water, pat dry, and let ambient air do the work. Gentle cleaning and a light conditioning finish the moment of waterproofing renewal.
Store in a cool, dry place with ventilation, upright or cushioned with paper to maintain shape. Cleanliness, drying, and careful storage together form the quiet ritual that keeps gumboots reliable in muddy dawns.
Preventative maintenance tips
Across farms and job sites, sixty percent of gumboots lose waterproofing within six months under heavy use. Waterproofing is not glamorous, but it is a quiet craft that keeps feet dry as rain tests the veld. Gentle rinsing, pat-drying, and ambient air drying form the core ritual.
To extend life, how to repair gumboots begins with steady care rather than dramatic fixes. Start with a cleansing routine, air-dry, then a light conditioning to restore suppleness before reproofing.
- Inspect seams, toes, and heels after each muddy spell
- Apply a silicone or neoprene-friendly spray to renew repellency
- Store upright in a cool, ventilated spot with room to breathe
Choosing replacement boots when needed
Across South African farms and job sites, sixty percent of gumboots lose waterproofing within six months under heavy use. Waterproofing is a quiet craft, a shield against rain and veld dust, kept by steady care through mud and miles.
To extend life, how to repair gumboots begins with cleansing, air-drying, and a light conditioning before reproofing. Treat each pair as a stubborn ally, and they will repay with dry feet and fewer slips on wet ground.
When signs of wear show at seams or the sole, replace boots.
In this quiet ritual, maintenance becomes a safeguard for the veld-worn boots and for the hands that rely on them.


0 Comments